Part 1: Prerequisites
Before we begin, let's install some necessary packages:
sudo apt install libvirt-daemon-system libvirt-clients qemu-kvm qemu-utils virt-manager ovmf
Enable required services sudo systemctl enable --now libvirtd
You should add your user to libvirt group (many times it's automatically done)
usermod -aG kvm,input,libvirt <username>
Restart your machine and boot into BIOS. Enable a feature called IOMMU. You'll also need to enable CPU virtualization. For Intel processors, look for something called VT-d. For AMD, look for something called AMD-Vi. My motherboard is unique so I had to enable a feature called SVM Mode. Save any changes and restart the machine.
Once you've booted into the host, make sure that IOMMU is enabled: dmesg | grep IOMMU
Also check that CPU virtualization is enabled:
- For Intel:
dmesg | grep VT-d - For AMD:
dmesg | grep AMD-Vi
Now you're going to need to pass the hardware-enabled IOMMU functionality into the kernel as a kernel parameter. For our purposes, it makes the most sense to enable this feature at boot-time. Depending on your boot-loader (i.e. grub, systemd, rEFInd), you'll have to modify a specific configuration file. Since my machine uses systemd and these configuration files are often overwritten on updates, I will be using a tool called kernelstub:
- For Intel:
sudo kernelstub --add-options "intel_iommu=on" - For AMD:
sudo kernelstub --add-options "amd_iommu=on"
Similarly, if your system is configured with GRUB2, you can achieve the same result by editing the /etc/default/grub file with sudo permissions and including the kernel parameter as follows:
- For Intel:
GRUB_CMDLINE_LINUX_DEFAULT="quiet splash intel_iommu=on" - For AMD:
GRUB_CMDLINE_LINUX_DEFAULT="quiet splash amd_iommu=on"
Edit /etc/default/grub
GRUB_CMDLINE_LINUX_DEFAULT="quiet splash intel_iommu=on"
or for AMD
GRUB_CMDLINE_LINUX_DEFAULT="quiet splash amd_iommu=on"
2. Creating a stub for the GPU
Next, we need to update the kernel command line to configure vfio-pci to consume each passthrough device to prevent it from being used by the hypervisor. If using GRUB, add another argument to GRUB_CMDLINE_LINUX_DEFAULT in /etc/default/grub in the following format (where PLACEHOLDER should be replaced with a comma-separated list of hardware IDs for your passthrough devices):
vfio_pci.ids=PLACEHOLDER
Once you modify this variable, it should look similar to the following example:
GRUB_CMDLINE_LINUX_DEFAULT="quiet splash intel_iommu=on vfio_pci.ids=10de:1c03,10de:10f1"
Finally, run the following commands (in the listed order) and reboot the hypervisor yet again:
update-initramfs -u
update-grub
After the hypervisor reboots, check that each required device was consumed by the vfio-pci kernel module. You should see vfio-pci on the line starting with “Kernel driver in use:” for each passthrough device:
03:00.0 VGA compatible controller [0300]: Advanced Micro Devices, Inc. [AMD/ATI] Navi 23 [Radeon RX 6600/6600 XT/6600M] [1002:73ff] (rev c7)
	Subsystem: XFX Limited Navi 23 [Radeon RX 6600/6600 XT/6600M] [1eae:6505]
	Kernel driver in use: vfio-pci
	Kernel modules: amdgpu
03:00.1 Audio device [0403]: Advanced Micro Devices, Inc. [AMD/ATI] Navi 21 HDMI Audio [Radeon RX 6800/6800 XT / 6900 XT] [1002:ab28]
	Subsystem: Advanced Micro Devices, Inc. [AMD/ATI] Navi 21 HDMI Audio [Radeon RX 6800/6800 XT / 6900 XT] [1002:ab28]
	Kernel driver in use: vfio-pci
	Kernel modules: snd_hda_intel
3. Imaging the GPU ROM
Before you can image the GPU ROM, you need to make sure that you’ve successfully completed the prior steps to blacklist the GPU and that you’ve configured your motherboard to use another graphics device as the primary video output. This is important because the GPU needs to be uninitialized when it is imaged or the ROM file may be garbled from previous initializations.
For some graphics cards or other PCI-e devices, this step may be unnecessary. Some GPUs can operate just fine without mapping a static ROM file; the virtual machine can just directly access the device ROM. Your results may vary, though. The primary purpose of this step is to ensure that successive virtual machine reboots won’t require the hypervisor to be rebooted to reset the GPU’s ROM to an uninitialized state.
First, make sure that your hypervisor has been freshly rebooted so that your GPU’s ROM is uninitialized. Next, run the following commands (replacing the example BDF identifier with your device’s BDF identifier) to obtain an image of the GPU ROM:
export PCIE_BDF_IDENT='01:00.0'
echo 1 > /sys/bus/pci/devices/0000\:"${PCIE_BDF_IDENT}"/rom
cat /sys/bus/pci/devices/0000\:"${PCIE_BDF_IDENT}"/rom > \
    /usr/share/qemu/gpu-"$(date +%Y%m%dT%H%m%S)".rom
$ echo 0 > /sys/bus/pci/devices/0000\:"${PCIE_BDF_IDENT}"/rom
Note: The process of extracting your GPU’s ROM only needs to be done for the primary function of your device, i.e. the “graphics” portion of the device.
The GPU ROM is now available at /usr/share/qemu/gpu-YYYYMMDDTHHMMSS.rom for use by libvirt and QEMU. You can name this file whatever you want for your own convenience.
4. Preparing the Virtual Machine
Now that the hypervisor is prepared for GPU passthrough, we need to configure the Windows® 10 virtual machine so that the GPU’s driver is unable to detect the virtualization environment. For the purposes of this tutorial, we’ll be using virsh to manually edit the virtual machine configuration. All of these changes will remain intact, even if you use Virtual Machine Manager.
Configuring the Virtual CPU
First, we must ensure that the virtual machine’s CPU model is set to host-passthrough. It is very important that you understand the difference between the “Copy host CPU configuration” checkbox and the host-passthrough CPU model: The former picks a similar virtual CPU that simply covers the feature set of the host CPU, where the latter configures QEMU’s virtual CPU to directly masquerade as the host’s CPU model.
The below figure containing screenshots of Task Manager in the guest operating system demonstrates the difference between the two configurations:

Run virsh edit <machine> to edit the configuration of your virtual machine (where <machine> is the name of your virtual machine’s libvirt profile). Find the <cpu> node in the XML tree and edit the value of its mode attribute so that it looks similar to the following line.
<cpu mode='host-passthrough' check='partial'>
Note: You may save the configuration and reboot after every modification to observe how it modifies the virtualization environment from your guest operating system’s perspective.
Hiding the Virtualization Environment
The first step to hide the virtualization environment is to disable the machine specific registers relating to KVM paravirtualization. Add the following code inside the <features> node of your virtual machine’s configuration using the virsh edit <machine>command.
Next, select one of the following methods to try to defeat virtualization detection from the guest operating system. There are two methods that can be used to hide the virtualization environment in Windows® 10:
-
Method A is the preferred method since it makes the virtualization environment harder to detect in the guest operating system and provides great performance if your CPU supports
constant_tsc. -
Method B is an alternative that uses Hyper-V enlightenments for improved performance on systems that don’t support
constant_tsc, but it may be easier to defeat via driver updates.
Note: Each method is mutually exclusive since Method B requires the hypervisor CPUID bit to be set so that Windows® will recognize and use the Hyper-V clock.
Open your virtual machine’s configuration for editing again by running virsh edit and pick one of the following methods to follow. It is recommended to reboot and perform benchmarks after each modification (where permitted by applicable end-user license agreements) so that you may determine which is the best performing configuration for your system.
Open your virtual machine’s configuration for editing again by running virsh edit <machine> and pick one of the following methods to follow. It is recommended to reboot and perform benchmarks after each modification (where permitted by applicable end-user license agreements) so that you may determine which is the best performing configuration for your system.
Method A: Disabling the Hypervisor CPUID Bit
Inside the <cpu> block of your virtual machine’s configuration, add the following line to disable the hypervisor CPUID bit.
<feature policy='disable' name='hypervisor'/>
This line should completely hide the virtualization environment from the perspective of the guest operating system, thus causing any virtualization check to pass.
Method B: Adjusting the Hyper-V Enlightenments
Inside the <features> node of your virtual machine’s configuration, make sure that you have a <hyperv> node that looks similar to the below example. You may use this example verbatim in your configuration.
<hyperv>
  <relaxed state='on'/>
  <vapic state='on'/>
  <spinlocks state='on' retries='8191'/>
  <vendor_id state='on' value='ahb6Wah2geeb'/>
</hyperv>
The <hyperv> node’s contents will ensure that Hyper-V enlightenments are available to the guest operating system for higher performance. The vendor_id tag overrides the default Hyper-V vendor ID to something unexpected by the graphics drivers, causing them to successfully pass the virtualization check.
Next, inside the <clock> node of your virtual machine’s configuration, add the following line to enable the Hyper-V clock.
<timer name='hypervclock' present='yes'/>
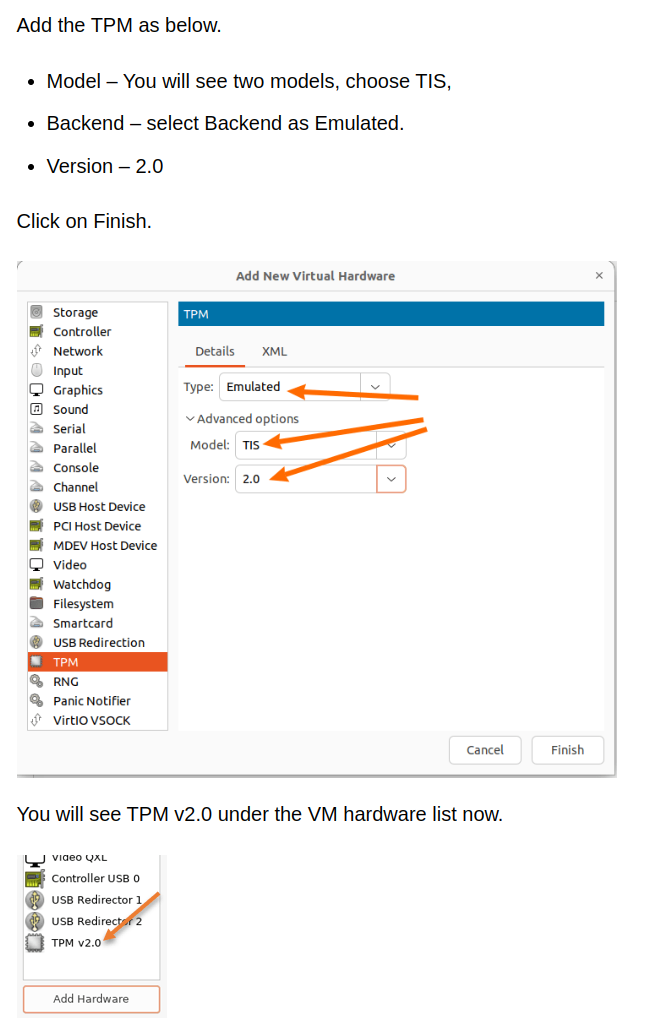
TPM
Passing keyboard/mouse via Evdev
If you do not have a spare mouse or keyboard to dedicate to your guest, and you do not want to suffer from the video overhead of Spice, you can setup evdev to share them between your Linux host and your virtual machine.
Note: By default, press both left and right Ctrl keys at the same time to swap control between the host and the guest. You can change this hotkeys. You need to set grabToggle variable to one of available combination Ctrl+Ctrl, Alt+Alt, Shift+Shift, Meta+Meta, ScrollLock or Ctrl+ScrollLock for your keyboard. More information: https://github.com/libvirt/libvirt/blob/master/docs/formatdomain.rst#input-devices
First, find your keyboard and mouse devices in /dev/input/by-id/. Only devices with event in their name are valid. You may find multiple devices associated to your mouse or keyboard, so try cat /dev/input/by-id/device_id and either hit some keys on the keyboard or wiggle your mouse to see if input comes through, if so you have got the right device. Now add those devices to your configuration:
$ virsh edit vmname
...
  <devices>
    ...
    <input type='evdev'>
      <source dev='/dev/input/by-id/MOUSE_NAME'/>
    </input>
    <input type='evdev'>
      <source dev='/dev/input/by-id/KEYBOARD_NAME' grab='all' repeat='on' grabToggle='ctrl-ctrl'/>
    </input>
    ...
  </devices>
Replace MOUSE_NAME and KEYBOARD_NAME with your device path. Now you can startup the guest OS and test swapping control of your mouse and keyboard between the host and guest by pressing both the left and right control keys at the same time.
You may also consider switching from PS/2 to Virtio inputs in your configurations. Add these two devices:
$ virsh edit vmname
...
<input type='mouse' bus='virtio'/>
<input type='keyboard' bus='virtio'/>
...
The virtio input devices will not actually be used until the guest drivers are installed. QEMU will continue to send key events to the PS2 devices until it detects the virtio input driver initialization. Note that the PS2 devices cannot be removed as they are an internal function of the emulated Q35/440FX chipsets.